
Tracing
A helpful step-by-step video on tracing can be found here.
Basics
** Points are another feature but as this project is concerned with roads and buildings, they will not be used.
1. Lines
1. To draw a line, click the Line button at the top of the editor
2. Find a road that has not been mapped yet and trace it by clicking along the route.
1. Little white circles will appear after each click, these are known as nodes
2. If at any point an error occurs, hit the undo button at the top or if the feature needs to be deleted right click on one of the nodes and click on the trash can icon.
3. When finished, double click on the last node
4. On the left side of the screen, the Edit Features panel should now have options for tagging the feature. Select the appropriate tag for the feature.
5. Hit save.
2. Areas
1. Areas work similar to lines.
2. Click on the Area button at the top of the editor.
3. Find a building that has not been traced and trace it.
4. When finished, double click on the last node.
1. Make sure to always square buildings by hitting S when the feature is selected
5. Go to the Edit Features Panel on the left and select ‘Building’.
1. This is a generic building tag as it is too hard to tell from aerial imagery what the actual use of the building is.
2. Never assume to know the use of a building.
6. If tagged properly the feature should appear as such:
For more information and tips on tracing please see the LearnOSM tracing guide found here.
Now it is time to map! Enjoy!


iD editor and tracing
iD editor is basic in-browser OSM editor that is relatively simple and easy to use. Below will be some simple instructions on how to trace and use iD editor. For a more in-depth explanation please see the LearnOSM iD editor guide found here. There is also a great editor training demo available called a ‘Walkthrough’. Access it from the Help button on openstreetmap.org.
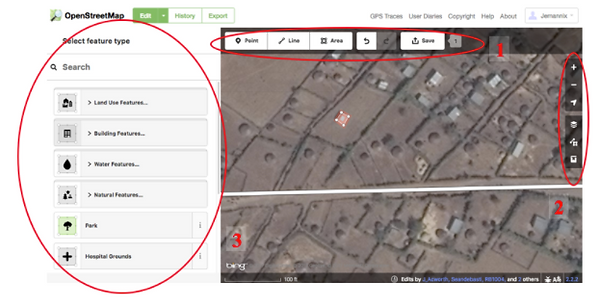
iD editor Interface
The interface will appear as such. There are three critical parts that have been numbered.
1.Tools
-
Points, lines, areas
-
These are the three tools to trace features.
-
-
Undo and Redo
-
Save
-
It is extremely important to save regularly after tracing features. If the features are not saved regularly and the system crashes, all of the features will be lost.
-
2. Map Panel
-
Zoom
-
Zooming in and out will make it easier to trace features as it may be hard at times to see different features.
-
-
Configuration
-
The remaining buttons:
-
‘Show my location’
-
Background settings
-
Map Data
-
Help guide (training demo called Walkthrough available here)
-
-
The only ones of real concern are the Background settings button, for instance if a different set of imagery is needed and the Help guide if there is any confusion.
-
3. Edit Features
-
This allows for the features to be tagged with appropriate metadata.
-
The only tags that will be used in this project are:
-
Building
-
Building = yes (Unless you have local knowledge of the area)
-
-
Road
-
For road tags in Africa use the following OSM wiki: http://wiki.openstreetmap.org/wiki/Highway_Tag_Africa
-
-

Using TeachOSM Tasking Manager
1. Login using your OpenStreetMap account
-
In the top right corner of the TeachOSM Tasking Manager webpage, click the ‘login to OpenStreetMap’ button.
-
Input the username and password that were created for the OpenStreetMap website
-
Now the tool can access your OSM account
-
Find and Select a task
2. On the main page of the TeachOSM Tasking Manager, there is a list of tasks that are currently available.
1. They all appear with a number, a title, a description of the task, a priority level, and a status bar to show the task’s level of completion.
2. For this project there are several available tasks but to become more familiar with searching through the TeachOSM Tasking Manager, use one of the below:
#391 - Better Preparedness: Dam Flooding Ethiopia
#392 - Better Preparedness: Dam Flooding Mozambique
#393 - Better Preparedness: Dam Flooding Togo - Part 1
#412 - Better Preparedness: Dam Flooding Togo - Part 2
#413 - Better Preparedness: Dam Flooding Togo - Part 3
3. They can also be found by typing in the name of the task on the search toolbar of the TeachOSM Tasking Manager Website
** If all of the tasks listed above are completed, please use this link for available tasks.
3. Start Contributing
-
Once a task is chosen, read through the details of the task to ensure that there are no special instructions on what should be completed and what should not be completed. Some tasks may only ask for buildings while others may ask for roads and buildings.
-
Once familiarized with the task, select the the ‘start contributing’ button
4. Select a square
-
Each project is split up into squares to allow for multiple users to contribute and work on a project at the same time.
-
Each of the boxes is a different section of the land and may contain different features. There is no benefit of choosing one box over the other.
-
Select a square by clicking on it and hit the ‘start mapping’ button.
-
Now the square will be locked so no other user may edit it until it is unlocked.
-
A locked square will appear with a yellow halo around it and its task information will appear as so:
5. Click ‘Edit with’
1. As seen above, the only way to edit and contribute is through one of several programs. Several of these programs require special training and will thus be disregarded for this project.
2. The one program that will be used is ‘iD editor’
3. Select ‘iD editor’ and a new page will pop up.


OSM Guide
Open Street Map (OSM) is an open source software that allows for users all over the world to map and contribute to its online platform that is free to all. OSM uses aerial imaging, GPS devices, and various geographic techniques to ensure the accuracy of the maps while allowing any user from any discipline to contribute or use the data. It is an easy and fun way to get involved in the mapping community and is essential to many humanitarian efforts run by organizations such as the Red Cross and the World Bank. The following information will provide the tools and resources necessary to assist with the efforts of OSM, but more specifically for the efforts of this project.
For more information about OSM and its impact please see here
**This is not a comprehensive guide, but a brief introduction on how to get started and start contributing to OSM. Other resources have been provided to better assist with any questions that may arise in the mapping process.
Validating
-
Task
-
Validate completed tasks
- Square buildings
- Ensure that all roads and buildings are properly tagged
-
For a JOSM validation guide see here
-
Tracing
-
Task
-
Map all buildings and roads
-
For buildings - use the tag building = 'yes'
-
For roads - please reference
-
-
As experienced OSM users we would like to first of all thank you for your assistance on this project!
This project focuses on flood risk management downstream of hydropower dams using crowdsource mapping. The information collected will be used to improve emergency preparedness and flood resilience for downstream communities affected by dam flooding.
There are two ways for experienced users to get involved: tracing and validation. There are five available tasks available that can be found on TeachOSM Tasking Manager. TeachOSM Tasking Manager is a tool that helps to organize a collaborative mapping effort and functions similar to the HOT OSM Tasking Manager.
The available tasks can be found by clicking the button below. The link will bring up a page in the Tasking Manager with the current projects listed. Please feel free to choose from any of the existing tasks and make sure to check back regularly as new tasks will be added!
Teach OSM
-
TeachOSM is an online resource to assist educators at all levels to introduce open source mapping using the OpenStreetMap platform in the classroom.
-
Training video for creating an account, getting to know OSM, and basics using a case study: (It also happens to have a voice over featuring Nuala)
Learn OSM
-
LearnOSM provides easy to understand, step-by-step guides for you to get started with contributing to OpenStreetMap and using OpenStreetMap and using OpenStreetMap data.
-
Beginner’s guide
-
How to get started with OSM
-
Step-by-step instructions to familiarize users with OSM and its interface
-
How to use ID Editor
-
Starting to map with a Tasking Manager for HOT or MissingMaps etc?
-
See our HOT-tips section.
-
-
OSM Wiki
-
For more specific information regarding things such as types of tags and what each feature actually entails
-
General information about OSM - https://wiki.openstreetmap.org/wiki/Main_Page (**Not necessarily for beginners)
-
-
-
Africa-specific tags for roads - http://wiki.openstreetmap.org/wiki/Highway_Tag_Africa
-
Comprehensive list of tags for OSM - http://wiki.openstreetmap.org/wiki/Map_Features
-
Tracing Guides
-
For more information on tracing features
-
Step-by-step tracing guide video - https://www.youtube.com/watch?v=VI--yT3RL5U
-
Learn OSM tracing guide - http://learnosm.org/en/beginner/id-editor/#basic-editing-with-id
-
JOSM
-
JOSM is an extensible editor for OpenStreetMap (OSM) for Java 8. It allows for advanced tracing and editing of features.
OSM Validation Guide
-
Validating data is an important part of OpenStreetMap: having experienced volunteers check OSM data to make sure it is complete, accurate and thorough.
-
Validation Guide using JOSM - https://drive.google.com/file/d/0B0sABsO67MIYSnZyT0x0M2lGLVE/view?usp=sharing
-
Experienced User
New User
OSM Resources
Getting Started
There are several steps that must be taken in order to contribute to OSM. The following is will take your through the primary steps to do so. If you are new to OSM, we highly recommend reviewing the links provided to give you a better understanding of how to start and continue contributing.
Creating an account
-
Visit the OSM website at www.openstreetmap.org
-
The website should appear as a scrollable map
-
-
Create an OpenStreetMap account
-
In the top right hand corner of the OSM website, there is the “sign up” button
-
-
Verify the account
-
After registering, if everything was successful, an email will be sent to verify the account
-
-
Log in
-
After verifying the account, in the top right corner on the main page of the OSM website, click on the “log in” button
-
Please feel free to view any and all tutorials offered, they are a great source of information
-
For a more in-depth guide for registering, please see the site here. For a video guide please use this link.
Aside from the main OSM website, there is a tool called “TeachOSM Tasking Manager”. It is a tool that will help you organize a collaborative mapping effort. It’s used here to coordinate and manage the work for this project. The website can be found at http://tasks.teachosm.org/.
Project Training Guides

Overview
One of the most difficult parts of tracing from aerial images is distinguishing between what is a building / road and what is not. This section will give a basic overview and background of different types of buildings that may be found in each of the projects. This is not a comprehensive list but will provide some clarification on each country's building types to give visual examples.
Building Examples
Ethiopia
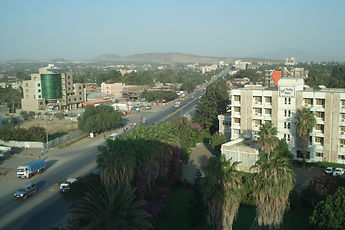
In Ethiopia, the majority of the population lives in rural areas with the largest city and capital, Addis Ababa, at an approximate population of only 3.4 million. For the project, the closest city is Adama, also known as Nazret, a central city and the capital of the Oromia Region. Its population is approximately 324,000 and the surrounding area is quite rural. In the city there is development of larger commercial buildings and homes. Almost every building will appear like in a typical city. In Adama, they appear as such:
However, the surrounding area is quite different. In the rural parts of the country, the homes are made out of stick, mud, or thatch walls. Many of these rural homes are attributed to different ethnic groups and regions but they are almost always circular with a thatched roof or rectangular tin-roofed homes. Some examples:
More information regarding homes in Ethiopia can be found here or here.


Togo
Togo is relatively small country of approximately 7 million people. Its largest city, and capital, Lomé is made up of only 800,000 people. For this project, the closest town is Atakpamé. It is a small city just north of Lomé consisting of around 72,000 residents and is relatively underdeveloped. there are few multistory buildings and the homes are built closely together. Most buildings have a metal roof.
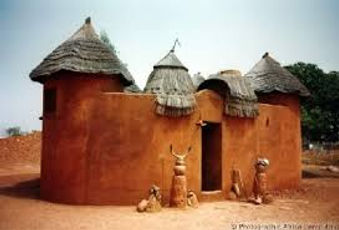
In rural areas, the standard house is called a 'Tata'. Tatas are traditional homes made out of mud, clay, and straw. They can appear round due to circular thatched roofs but will generally have multiple connected sections that create a larger home.


Mozambique
Mozambique is the middle ground between Ethiopia and Togo with an approximate total population of around 25 million. Its largest city and capital is Maputo with a population of around 1.2 million. This project actually incorporates the city of Tete, the capital of the Tete Province. It has a population of around 150,000 and is essential part of the economy of Mozambique due to its large coal reserves. The city is built up with some large residential and commercial buildings.
Around 90% of the population lives in rural areas without these large industrial buildings. Many of the homes are either made out of cement with tins roofs. Some will are even more traditional with round huts made out of mud with thatched roofs.


